Windows environment setup
1.2 Configure the environment
1.2.1 Msys2
Msys2 offers a ton of Unix/Posix tools on Windows. To install it, first go to MSYS2 page, download and run the installer.
After that you can change the path in buildsupport/macros_and_definitions.cmake. Or make our life easier and add DRIVE_LETTER:\\path_where_you_installed_msys\\msys64\\mingw64\\bin folder to your PATH.
1.2.2 WSL
1.2.2.1 Important info about WSL
WSL is awesome (the v1, v2 is just a glorified VM managed by MSFT). You can have both versions simultaneously, but that is really unnecessary. Before telling you the WSL page, I must inform you that you should read the rest of this section before installing anything.
When installing WSLv1, you won’t need to enable the Virtual Machine Platform (VM support in MSFT speak). Pros: you can see linux processes on Windows task manager, enabling VM support makes Windows run on top of the Hypervisor (Hyper-V), which in turn prevents the host OS (a.k.a. Windows) from accessing a ton of performance counters (used by AMD uProf, Intel V-Tune and others). Cons: filesystem performance is trash, long doubles are 64 bit instead of 80 bit, Qt and other libraries may have an ABI section which is not parsed correctly and cause issues, stack execution is prohibited, etc.
If you want to use WSLv1 without having to install the Virtual Machine garbo, first enable WSL and then run wsl --set-default-version 1 on the command prompt with administrative rights. That will prevent distributions from trying to use WSLv2, which will require you to install Virtual Machine Platform to finish installation and then allow you to migrate to WSLv1.
WSLv2 on the other hand is a glorified VM running on top of the Hypervisor (not Windows).
If you access stuff from WSL mounts (e.g. /mnt/c/Users/Gabriel/Desktop) you have even worse performance than in WSLv1.
This is why I still use v1 and will continue to do so. If you put your code inside the VM, performance is near baremetal.
1.2.2.2 Installing WSL
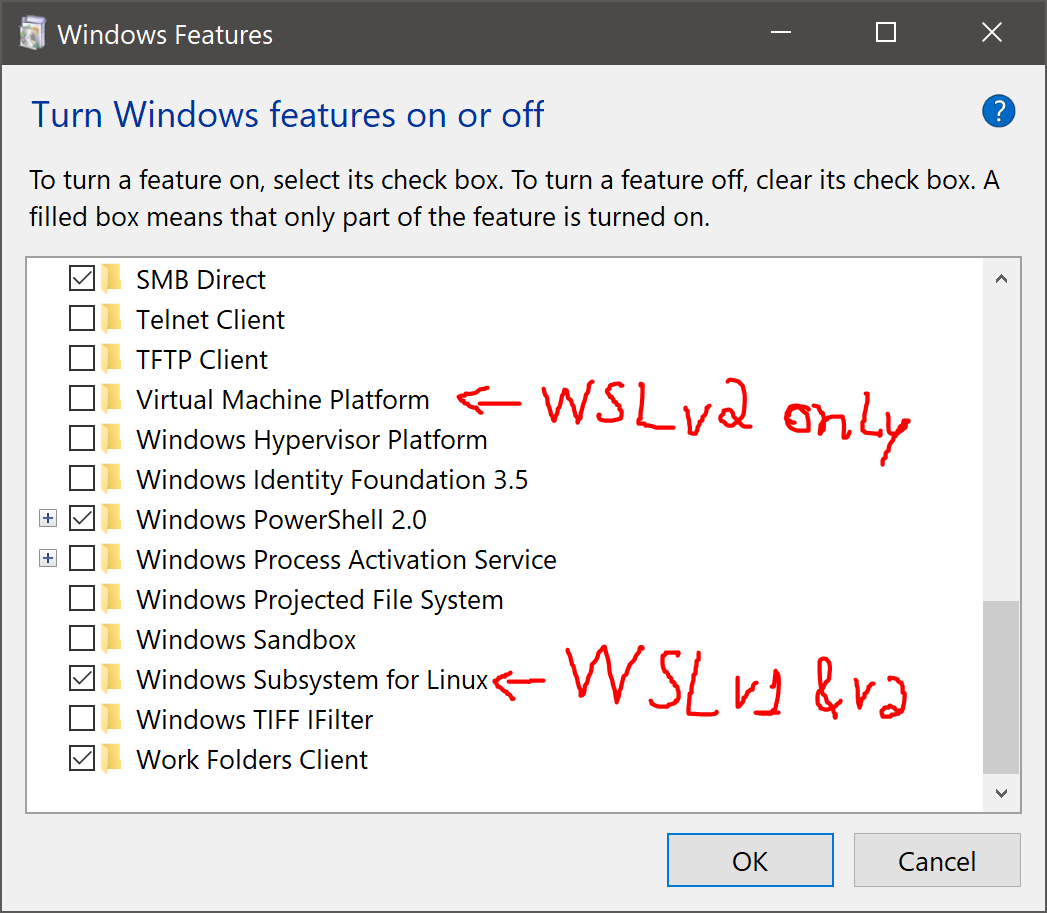
You can enable WSL by clicking checkboxes in “Turn Windows Features on or off”.
Or you can use the command line/prompt. For WSLv1 and WSLv2 you will need to run the following command as an administrator.
dism.exe /online /enable-feature /featurename:Microsoft-Windows-Subsystem-Linux /all /norestart
If you’re installing WSLv2, make sure to enable the “Virtual Machine Platform” and “Windows Subsystem for Linux” in your control panel (or through command line).
dism.exe /online /enable-feature /featurename:VirtualMachinePlatform /all /norestart
WSLv2 requires an additional package with the Linux Kernel, that Microsoft started shipping separately from Windows. You can find it here. Same link can be found in their official page, but I’m color blind and the link was not immediately clear.
In case of trouble, look at the WSL official installation page.
1.2.2.3 Setting up WSL for development
I usually use Jetbrains CLion, and they wrote instructions and a litte script that setups everything automagically.
Just configure CLion to use WSL and enter your SSH port (2222 in their script), username and password.
If you’re interested in GUI applications running inside WSL (e.g. NetAnim), you can install a X11 server on Windows (e.g. VcxSrv) and redirect your WSL applications to it.
To redirect GUI application to the X11 server on Windows, add the following to the last line of ~/.bashrc:
- For WSLv1:
DISPLAY=:0 - For WSLv2:
DISPLAY=$(cat /etc/resolv.conf | grep nameserver | awk '{print $2}'):0
To run the VcxSrv after each reboot, either search for Task Scheduler and create a task manually to run every boot and login with
- Command:
"C:\Program Files\VcXsrv\vcxsrv.exe" - Arguments:
:0 -ac -terminate -lesspointer -multiwindow -clipboard -wgl
Or download this XML and run the following with administrative priviledges:
schtasks /create /TN "VcxSrv" /XML ".\VcxSrv.xml"
schtasks /Run /TN "VcxSrv"